Selling design sets manually is not comfortable and not the way. The workflow of where the user was waiting for the license to be delivered, even the payment and order was complete instantly, is affecting the user experience.
Hence, tha Asura plugin bundled with native integration for popular e-commerce platform such as WooCommerce and Easy Digital Downloads. Selling design sets made easy!https://www.youtube.com/embed/ThVEEm50Zt4
https://www.youtube.com/embed/6ncIUQLReYs
Prerequisite
- Navigate to Oxygen > Asura
- Click the Remotes tab at the top of the screen.
- Choose and take a note the remote’s id on the
Sitecolumn from the Remotes list table. - Click the Generators tab at the top of the screen.
- Select the target site (step #3) from the “📌 Remote” dropdown on the top right of the screen, and click the refresh 🔄️ button
- Choose and take a note the generator’s id on the
Namecolumn from the Generators list table.
Asura Settings
WooCommerce
- Navigate to Oxygen > Asura
- Click the Settings tab at the top of the screen.
- Click the WooCommerce sub-tab.
- Tick the “Enable Integration” checkbox.
- (Optional) Tick the “Purchase page” checkbox if you want to show use license on their purchase page.
- (Optional) Tick the “Receipt Email” checkbox if you want to append the receipt email with the license.
- click the Save Changes button.
Easy Digital Downloads
- Navigate to Oxygen > Asura
- Click the Settings tab at the top of the screen.
- Click the Easy Digital Downloads sub-tab.
- Tick the “Enable Integration” checkbox.
- (Optional) Tick the “Purchase page” checkbox if you want to show use license on their purchase page.
- (Optional) Tick the “Receipt Email” checkbox if you want to append the receipt email with the license.
- click the Save Changes button.
Product Configuration
WooCommerce
- Navigate to Products > All Products
- Choose the product and click the “Edit” link.
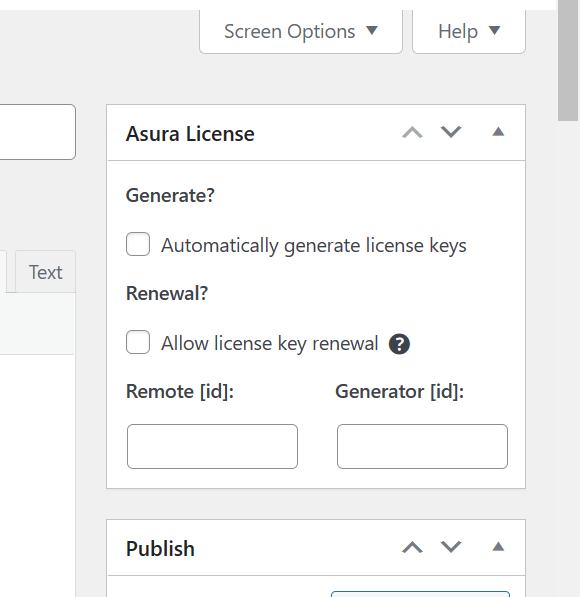
- On the right side of your screen, you’ll see Asura License metabox.
- Tick the “Generate?” checkbox.
- Fill the “Remote [id]” field with the remote ID. Step #3 of Prerequisite section.
- Fill the “Generator [id]” field with the generator ID. Step #6 of Prerequisite section.
- Save the product.
Easy Digital Downloads
- Navigate to Downloads > All Downloads
- Choose the downloads and click the “Edit” link.
- On the right side of your screen, you’ll see Asura License metabox.
- Tick the “Generate?” checkbox.
- Fill the “Remote [id]” field with the remote ID. Step #3 of Prerequisite section.
- Fill the “Generator [id]” field with the generator ID. Step #6 of Prerequisite section.
- Save the downloads.
Preview Page
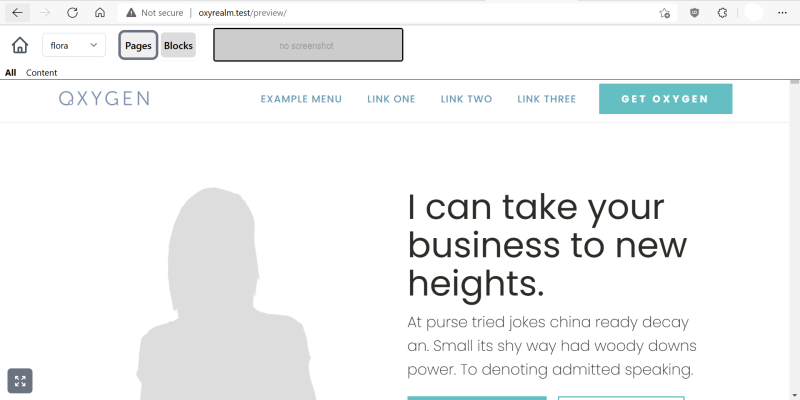
It is good to show your potential customer a preview of your design sets.
- Navigate to Pages > Add New
- Fill the page’s title.
- Add new block with type
[/] shortcode - Paste the snippet below to the shortcode block
[asura_demo designset="all"] - Scroll to the bottom of the gutenberg editor page. You will find the Oxygen meta box.
- Change the “RENDER PAGE USING TEMPLATE” dropdown value
None - Click the
+ Shortcodeslink to open the textarea. - Paste the snippet below to the
+ Shortcodestextarea
[ct_section ct_sign_sha256='<span class="hljs-number">8</span>a21d47acd141a46dc84bea6e6dd1c270700a75cc8437dd860b4229a9486ba69' ct_options='{<span class="hljs-attr">"ct_id"</span>:<span class="hljs-number">1</span>,<span class="hljs-attr">"ct_parent"</span>:<span class="hljs-number">0</span>,<span class="hljs-attr">"selector"</span>:<span class="hljs-string">"section-1-454"</span>,<span class="hljs-attr">"original"</span>:{<span class="hljs-attr">"section-width"</span>:<span class="hljs-string">"full-width"</span>,<span class="hljs-attr">"container-padding-left"</span>:<span class="hljs-string">"0"</span>,<span class="hljs-attr">"container-padding-top"</span>:<span class="hljs-string">"0"</span>,<span class="hljs-attr">"container-padding-right"</span>:<span class="hljs-string">"0"</span>,<span class="hljs-attr">"container-padding-bottom"</span>:<span class="hljs-string">"0"</span>},<span class="hljs-attr">"activeselector"</span>:<span class="hljs-literal">false</span>}'][ct_text_block ct_sign_sha256='<span class="hljs-number">129</span>b4fc2a0d46b83d1011bfb15f96a7cf36d5568a86bd2bb7c965b5223291097' ct_options='{<span class="hljs-attr">"ct_id"</span>:<span class="hljs-number">2</span>,<span class="hljs-attr">"ct_parent"</span>:<span class="hljs-number">1</span>,<span class="hljs-attr">"selector"</span>:<span class="hljs-string">"text_block-2-454"</span>,<span class="hljs-attr">"original"</span>:{<span class="hljs-attr">"width-unit"</span>:<span class="hljs-string">"%"</span>,<span class="hljs-attr">"width"</span>:<span class="hljs-string">"100"</span>},<span class="hljs-attr">"activeselector"</span>:<span class="hljs-literal">false</span>}'][ct_span ct_sign_sha256='<span class="hljs-number">543</span>ff191a22689cfbca14744ed7d6b049a5082c72ffcd4569048370962245cdb' ct_options='{<span class="hljs-attr">"ct_id"</span>:<span class="hljs-number">3</span>,<span class="hljs-attr">"ct_parent"</span>:<span class="hljs-number">2</span>,<span class="hljs-attr">"selector"</span>:<span class="hljs-string">"span-3-454"</span>,<span class="hljs-attr">"original"</span>:{<span class="hljs-attr">"width-unit"</span>:<span class="hljs-string">"%"</span>,<span class="hljs-attr">"width"</span>:<span class="hljs-string">"100"</span>},<span class="hljs-attr">"classes"</span>:{<span class="hljs-attr">"0"</span>:<span class="hljs-string">"oxy-stock-content-styles"</span>}}'][oxygen ct_sign_sha256='<span class="hljs-number">91</span>da15648fe7b933f3cdb8acd28af076791809d0eb0372d7d159a4ce30c02acb' data='content' ][/ct_span][/ct_text_block][/ct_section]Save the page.Follow the Oxygen’s official documentation on how to sign the shortcode.